Riot’s Valorant is filled to the brim with fun and misery when it comes to lags and stutters. While running fine for some, the game does indeed suffer from some hitches here and there that might interfere with your otherwise optimal playing experience. Even though you might meet the minimum system requirements, your game might end up feeling quite slow and sluggish at times.
With that said, there’s a few fixes we’re going to be talking about down below that have been tried and tested by us here at BRGeeks. While they may seem really obvious to some, we still recommend ticking all the boxes before moving onto more niche cases. We also have a very comprehensive tier list of all the Valorant agents that you might want to check out.
Valorant: Fix Lag, Stutters, and Low FPS
With poor aliasing and jagged edges turning into a major issue for Valorant, login and stutering are perhaps still the most annoying. These tweaks we’ve mentioned down below should add a considerable boost in performance to the game.
Make Sure Your PC Meets the System Requirements
A lot of crashes and inconsistencies can be caused if you are trying to run the game on a PC that is below the minimum system requirements. We will be mentioning the official system requirements below:
Minimum System Requirements (30FPS @ 1080p)
- CPU: Intel Core 2 Duo E8400 (Intel), Athlon 2000GE (AMD)
- GPU: Intel HD 4000, Radeon R5 200
- RAM: 4GB
- OS: Windows 7 / 8 / 10 / 11
Recommended System Requirements (60FPS @ 1080p)
- CPU: Intel i3- 4150 (Intel), Ryzen 3 1200 (AMD)
- GPU: Geforce GT 730, Radeon R7 240
- RAM: 8GB
- OS: Windows 7 / 8 / 10 / 11
High-End System Requirements (144FPS+ @ 1080p)
- CPU: Intel i5- 9400F (Intel), Ryzen 5 2600x (AMD)
- GPU: GTX 1050Ti, Radeon R7 370
- RAM: 16GB
- OS: Windows 7 / 8 / 10 / 11
If you are running Windows 11, you’ll also be required to enable TPM 2.0 and UEFI Secure Boot from your BIOS settings.
Read More: Best Valorant Settings Guide for Max FPS Optimization & High Performance
Debloat Your Windows Installation

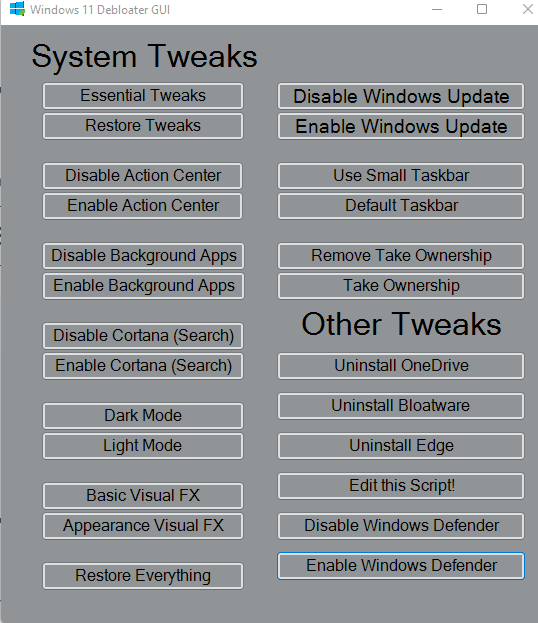
Riot’s Vanguard Anti-Cheat doesn’t bode well with overlays and all sorts of bloat that may come in your system. To increase performance and rid yourself of lag, here’s how you can de-bloat your Windows 10 / 11 installation for optimal performance
- Download Windows 11 Debloat
- Once downloaded, extract the file and run launch.bat as an Administrator
- Now, select the following options:
- Essential Tweaks
- Disable Action Center
- Disable Background Apps
- Disable Cortana
- Uninstall Bloatware
After performing these steps, your computer should run much faster, and consequently so will Valorant!
Set CPU Priority to High
Valorant is known to be a CPU hog and tends to not acclimate to multiple CPU cores well. You can use the Task Manager to reduce lagging / stuttering in the game.
- Open the Start Menu by pressing the Windows key and open the Task Manager
- Now, head on to Processes and right click on Valorant
- Change theh Priority of the Process to High
While you are at it, make sure to close down any other background processes in the Task Manager as well.
Log Out of Discord

We get it, Discord is the primary place you chat up with your friends while you land those sick Operator shots. However, a bad Discord config can lead to your microphone and audio codecs messing up leading to lagging and stutters in the game itself.
To disable Discord, head to the Settings icon present in the bottom-left of your screen, scroll down to the Log Out option present at the end. If your performance seems to have shot up after doing so, re-install Discord and give things another go.
Update Your Graphics Drivers
Both NVIDIA and AMD aren’t that great at keeping your drivers up-to-date. More often than not, you’ll need to manually update the drivers yourself. However, sometimes, even after doing so, Valorant might not end up running that smoothly. In those cases, here’s what you need to do:
- Run Display Driver Uninstaller (DDU)
- Reboot your System
- After doing so, install the following driver for NVIDIA and AMD, respectively:
After installing your NVIDIA drivers, make sure you’ve set the Control Panel up in the most optimal way possible.
Note: Both of these drivers have been tried and tested and are known to deliver optimal performance for Valorant. If the latest version of the drivers for your respective graphics card does not work, try these!
Disable Xbox Game Bar
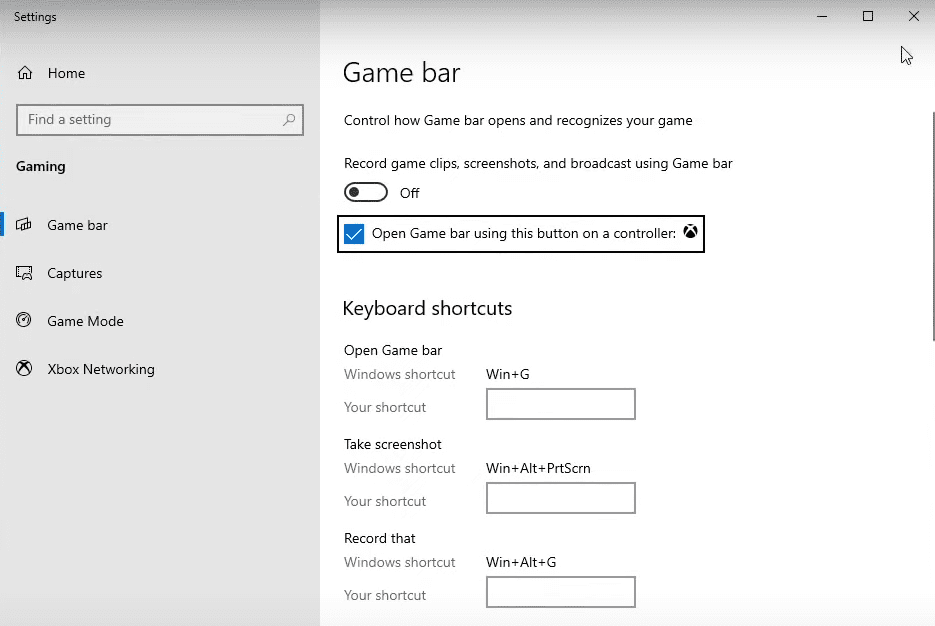
Xbox Game Bar is another nifty Windows utility that is enabled by default and often causes issues, and FPS drops with multiplayer games like Valorant, Rainbow Six Siege, and Fortnite.
So, we will be disabling it to eliminate the possibility of it causing your frame drops while you play Valorant. To disable Xbox Game Bar, you need to follow the following steps:
- Click on the Start Menu
- Type “Game Bar”
- Select “Game Bar Controller Settings”
- Set the first toggle button you see to “Off.”

Change Windows Power Mode Settings
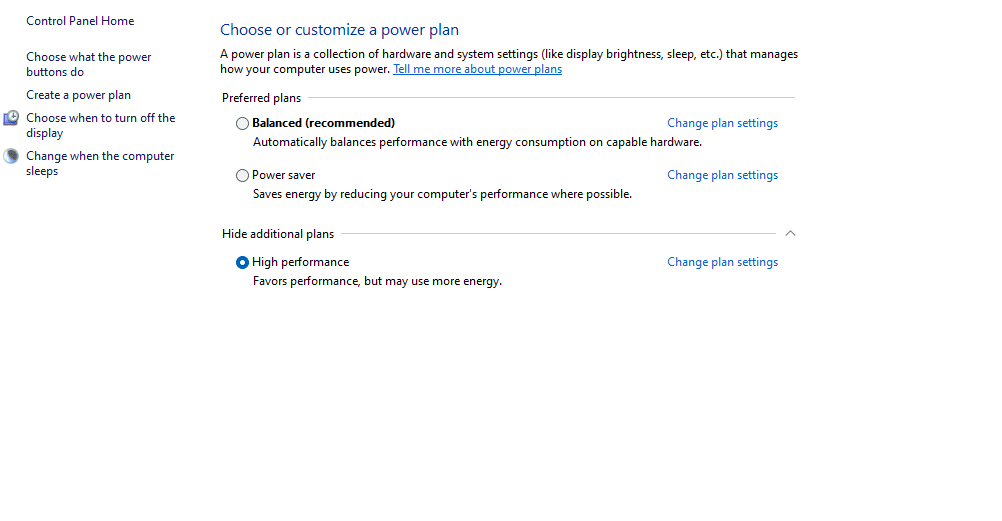
Sometimes, Windows sets your power mode to Balanced or Power Saving mode, which hinders your hardware and doesn’t let it perform at its maximum capacity. We recommend checking your PC’s Power Plan settings and setting it to “High Performance.” To do that, follow these steps:
- Click on the Start Menu
- Type “Power”
- Select “Power & Sleep Settings”
- Click on “Additional Power Settings” under the Related Settings heading.
- Select the “High Performance” power plan.

Did any of these tweaks work out? Let us know in the comments section down below! If you have any further suggestions, we’d love to hear them out!


