The NVIDIA Control Panel is an important part of your gaming experience if you’re the proud owner of an NVIDIA card. However, there are a few quirks, settings, and features you can take advantage of to get your gaming performance to the next level. In this guide, we’re going to talk about how you can increase your FPS, turn on G-Sync, use all of NVIDIA’s features alongside the best Control Panel Settings for 2021.
If you’ve been suffering from low FPS on your card lately, are suffering from jagged edges or aliasing, have just bought a new high refresh rate monitor, or want to increase your monitor’s color depth to its maximum potential, we’re going to be covering all that and much more! So, read on down below.
NVIDIA Control Panel Settings (High FPS)
First things first, there are a few particular settings in your Control Panel that you must change so that you can get the best performance possible out of your card. This applies to all latest NVIDIA Cards, including the RTX 2000 and 3000 Series. We’ll also be mentioning some particular settings that are helpful for mobile variants of the GPUs.
Here’s how you can open the Control Panel on your Computer:
- Left-click on your Windows Desktop
- Open the Windows NVIDIA Control Panel
- If you do not find the option there, you’ve not installed your drivers properly. You can do so by clicking here.
Here are the best settings for the NVIDIA Control Panel in 2021 for High FPS and Performance for RTX 2000, 3000 and GTX 1000 series cards:
Note: Before attempting these settings, reset your previous settings to the default values.
- Go to Manage 3D Settings in the NVIDIA Control Panel
- Click on the Global Settings Tab
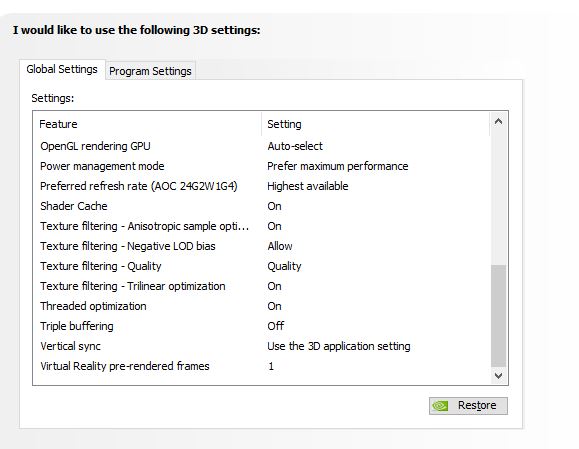
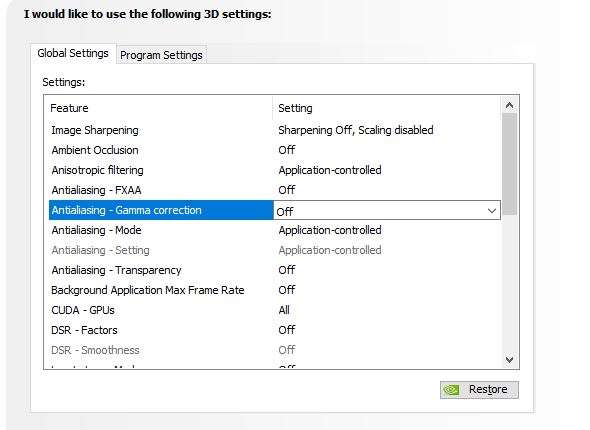
- Change your settings to the following:
- Image Sharpening: Sharpening Off, Scaling Disabled
- Ambient Occlusion: Off
- Anisotropic Filtering: Off
- Antialiasing – FXAA: Off
- Antialiasing- Gamma Correction: Off
- Antialiasing – Mode: Off
- CUDA – GPUs: All
- DSR – Factors: Off
- Low Latency Mode: Off
- Max Frame Rate: Off
- Monitor Technology: G-SYNC Compatible
- Power Management Mode: Prefer Maximum Performance
- Shader Cache: On
- Texture Filtering Anisotropic Sample Option: On
- Texture Filtering – Negative LOD bias: Allow
- Texture Filtering – Quality: High Performance
- Texture Filtering – Trilinear Optimization: On
- Threaded Optimization: On
- Triple Buffering: Off
- Vertical Sync: Off
- Virtual Reality Pre-Rendered Frames: 1
Increase Monitor Refresh Rate and Increase Color Depth
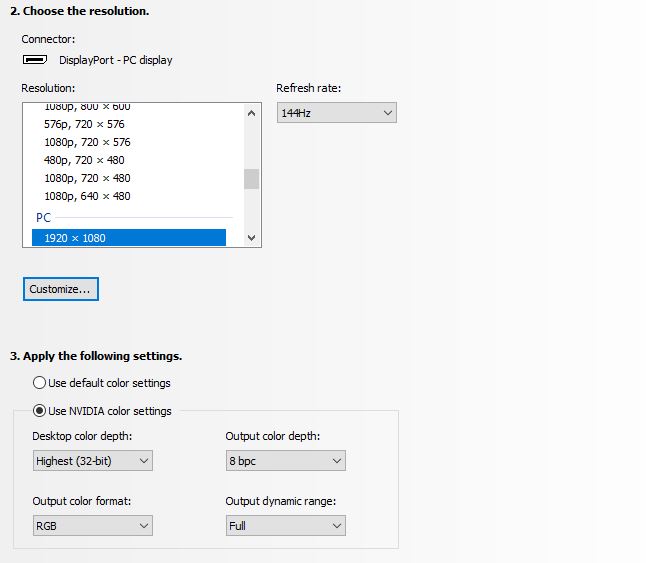
If you’ve just purchased a new monitor, you’ll need to increase your color depth while also adjusting your monitor’s refresh rate from 60 to 120 / 144 / 240 / 360 Hz. Here are the steps you need to follow to do just that:
- Open your Nvidia Control Panel
- Go to Change Resolution
- Scroll down to the PC Tab, choose the highest Resolution and Refresh Rate
- In the Output Dynamic Range Dropdown, select Full
How To Turn On G-Sync
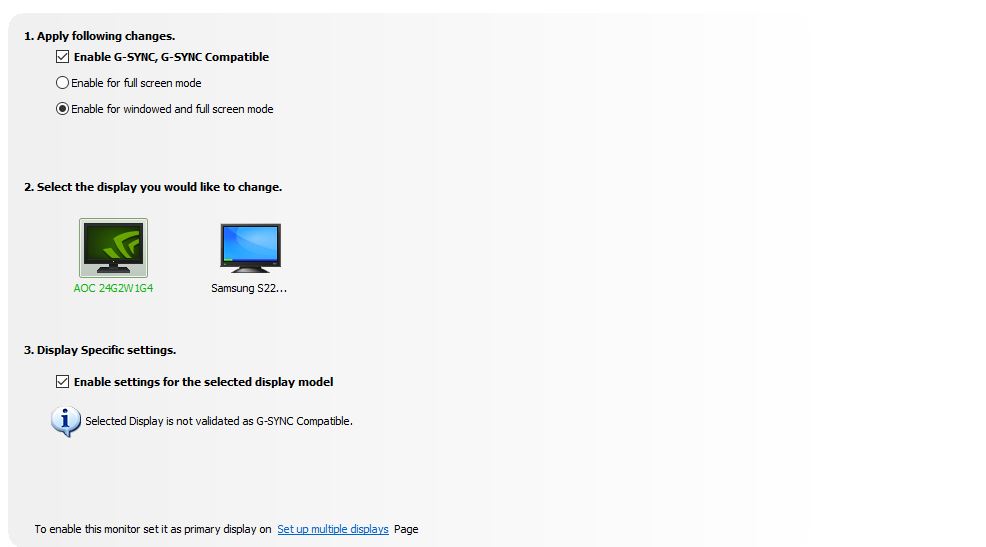
G-Sync is NVIDIA’s proprietary technology that synchronizes your monitor’s refresh rate to GPU’s clock cycles. If you have a high refresh rate monitor, the chances are that you will need to enable it from your NVIDIA Control Panel to take full advantage of it. Here’s how you can do so:
- Open your Nvidia Control Panel
- Go to Setup G-SYNC
- Click on Enable for windowed and full screen mode
- Click on Enable settings for the selected Display Model
Note: If your monitor shows up as not validated for G-SYNC, don’t worry! It should still work just fine.
How to Fix Jagged Edges / Aliasing
Jagged Edges, Aliasing, Blurred Lines, and Shimmering are all common problems you might have noticed in your games. If you are a Valorant player and are having trouble with Jagged Edges, we have a dedicated guide for you! However, here are some general steps you can take advantage of to help you with removing artifacts, jagged edges, aliasing, and blurred lines:
In NVIDIA Control Panel:
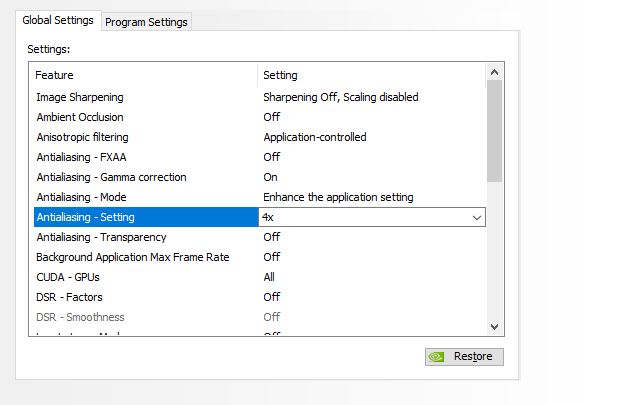
- Manage 3D Settings:
- Antialiasing – Setting: 4x
- Antialiasing – Mode: Enhance the Application Setting
- Antialiasing – Transparency: Off
- Texture Filtering – Quality: Performance / Quality (Dependent on your card.)
- Texture Filtering – Negative LOD Bias: Allow
DSR Method:
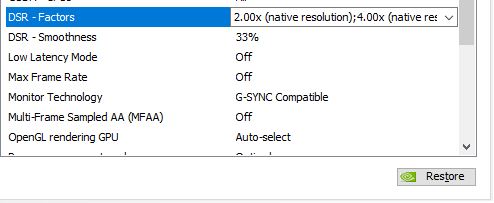
Dynamic Super Resolution can be used to help with jagged edges, blurred lines, shimmering, and artifacts. However, it requires a beefy GPU. You can turn it on from your NVIDIA Control Panel and set the scale to 2.0x or 4.0x depending on your GPU.
After that, boot up the game you have an issue on and increase the resolution to the maximum available. If you have a 1080p monitor, you can go up to 4k. Your GPU will then scale the game down for you while rendering it at a higher resolution making the game look significantly sharper.
How To Completely Uninstall NVIDIA Driver
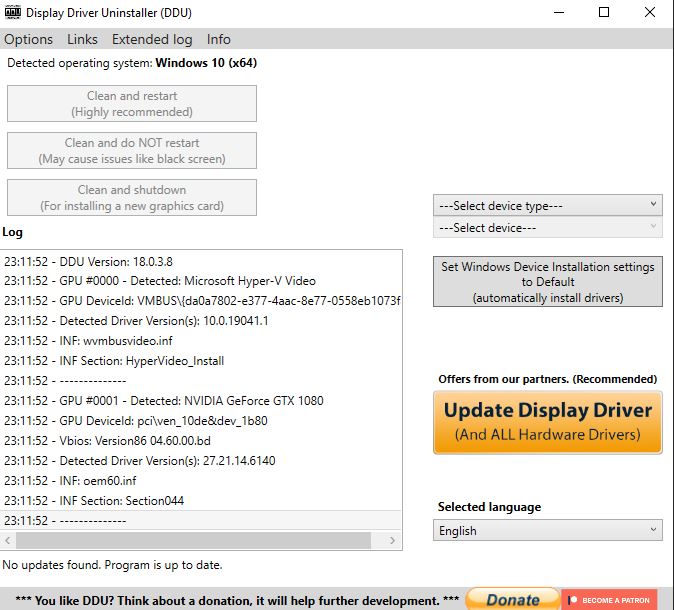
If you are having trouble with your GPU’s drivers, uninstalling it through Control Panel won’t do the trick as there will still be tons of temporary files lurking around your AppData folder. So, if you really want a fresh clean format and aren’t in the mood for formatting, here’s how you can completely uninstall your NVIDIA Driver:
- Download DDU for free.
- Go through the installation process and make sure to remove your Driver Settings from the Registry
After you’ve gone through the process, re-boot your computer. You should now bbe able to do a completely fresh install of the driver.
We hope this comprehensive NVIDIA guide helps address some of your queries regarding your NVIDIA GPU. If you want us to answer something in particular, let us know in the comments section down below!

