Creating a unique farm is one of the most exciting things you’ll do when starting a new Minecraft world. The possibilities are endless, and you can make your farm as intricate or basic as you want. This guide will help you build an amazing farm by providing you with some of the Best Farming Ideas in Minecraft.
Best Farming Ideas for Minecraft
The concept of farming in Minecraft is that you’ll be creating a functional and sustainable ecosystem. What you want to farm is entirely up to you, and it can be as simple as a berry farm or as complex as a fuel or lava farm.
Players often get confused because of the abundance of choices, and that’s where we come in. We’ll be listing some of the best and most creative farming ideas for you throughout this guide. We will aim for farms that are fun to build and easy to work around.
The ideas will include farms of all types, such as sheep wool, bamboo, stone, etc. So, no matter how picky you are, there is bound to be a farm on this list that is perfect for you.
Automatic Crop Farm in Minecraft
Acquiring a steady food supply should be one of your top priorities whenever you start a new world. If you can create an automated system for that, you can focus on gathering other materials and building other stuff.
You can turn this farm into an automatic farm for carrots, potatoes, or even wheat. Start by creating a 10×10 base using glass panels. Then leave a gap of 1 square and place another 10×10 square. Both of these squares will be 2-block tall, and you’ll be placing shroomlights in the middle of the gap you left on all 4 sides.
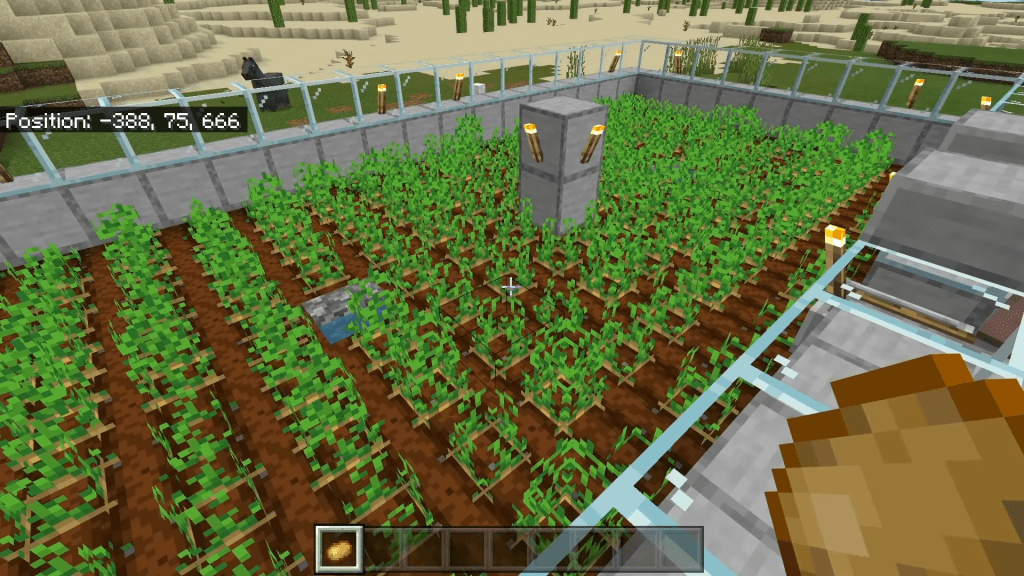
We have chosen glass blocks to see the crops while standing outside. Now, go inside the square and dig 1 grass block in the middle of the square. You’ll be placing a water bucket here and then covering it up with Composter. This water source will provide water for the crops inside this square. You can place another shroomlight on top of the Composter to brighten your farm. Now, place the crop of your choice, and voila! Your automatic crop farm is ready. You can repeat the same process and, this time, choose a different crop to increase the type of crops you have in your storage.
Cow Farm in Minecraft
The next step in expanding your resources is to gather meat and leather. You can do that by building a Cow Farm. We will be able to breed cows here and get raw meat and leather from them.
To build this farm in Minecraft, you’ll need the following resources:
- Stone Stairs
- Stone Blocks
- 2x Cows at least
- Some Wheat
Build a simple farm using stone blocks and stone stairs to trap the cows. Leave some space open on one side for the cows to enter. Then, all you need to do is guide the cows towards the entrance and then close it.
You can do that using wheat to steer cows towards the farm block. You’ll need 2 cows as a bare minimum to start a breeding farm.
Bone Meal Farm in Minecraft
You can use Bone Meal as a fertilizer in Minecraft, so having a bone meal farm can be quite advantageous for you. To build the farm, you’ll need the following resources & any other additional things you wanna add are entirely up to you:
- Cactus
- Sand Blocks
- Glass Panes
- Water
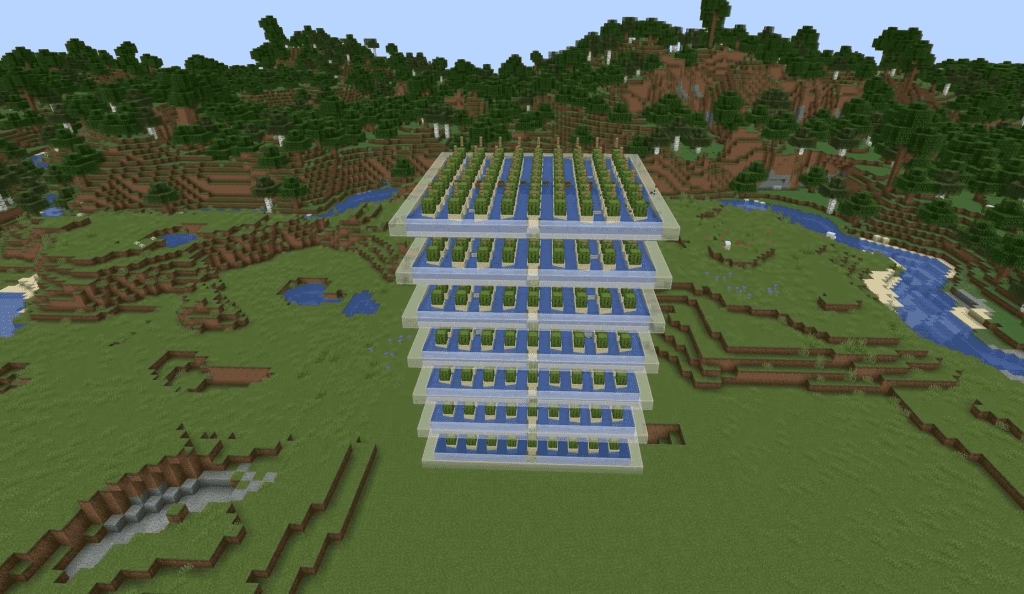
You can have a 6×9 block formation or a 9×12 block formation according to your needs, and then place sand blocks in the middle of the area, followed by cactuses on top of those sand blocks.
For the walls, we suggest glass panes to see whatever is going on inside, and it gives a rather neat look. You can replace cactus with any other farmable crop or resources classified as a bonemeal, such as melons, whiter skeletons, etc.
Stone Farm in Minecraft
You’ll be needing tons of stones throughout your adventures in Minecraft, so it is always wise to spend some time and get a stone farm up and running. This will be one of the most beginner-friendly farms you can build, and the only thing you’ll be spending time looking for is a lava source.
You’ll need the following resources to build this farm in Minecraft:
- A Stack of solid non-burnable blocks
- 4 Stairs
- 8 chests
- 4 Hoppers
- 2 x Water Buckets
- 1x Lava Bucket
Start building the farm by placing 4 double chests horizontally in a corner and then placing 4 hoppers next to the chests facing them. Now surround the whole lower layer with solid blocks of 2-block height.
Now, place the stairs on the other edge of the chests with the stairs facing inwards ( towards the chests). Now drop a water bucket and surround the whole thing with another layer of solid blocks.
Now place the lava bucket in the center of the cavity, and it should start to slowly turn the water into stone. Go down to the first layer and remove one block from the middle of either side to see your stone come out.
Berry Farm in Minecraft
Another great farming idea we’ll suggest here is making a fruit farm. You can get it up and running in just a few steps, and it doesn’t require too many resources. You’ll need the following resources to build a berry farm in Minecraft:
- Grass Blocks
- Spruce Fence
- Spruce Slabs
- 7 Sweet Berries
Start by digging 7 blocks vertically or horizontally, filling those holes with grass blocks. Place 1 Spruce Slab and then plant 7 berries or any other fruit seed you want to grow on the grass blocks. Then, cover the whole thing with Spruce Slabs. Now, you’ll be able to grow berries and use them to replenish your hunger points.
Cobblestone Farm in Minecraft
You can build an automated Cobblestone Farm in Minecraft very easily, and then you’ll have a steady supply of Cobblestone. It can be farmed by mining stone and adding a Lava Bucket into the mix.
Cobblestone can be used to craft a plethora of different items such as dispensers, pistons, and even droppers. To build the farm, you’ll need the following resources.
- 2 Chests
- 2 Hopper
- 39 Obsidian
- 65 Glass
- 3 Trapdoor
- 14 Stairs
- 1 Slab
- 16 Cobblestone
- 1 Packed Ice
- 18 Water
- 16 Lava Buckets
The build won’t take you much time, and 2ManySkillz has done an excellent video on this farm idea. Check his video and follow it step by step to get the farm going.
Wheat Farm in Minecraft
This basic farm design is expandable once you get enough resources and can be used to farm wheat very easily with just 1 villager present. You can use the same farm for farming carrots, potatoes, and even beat roots.
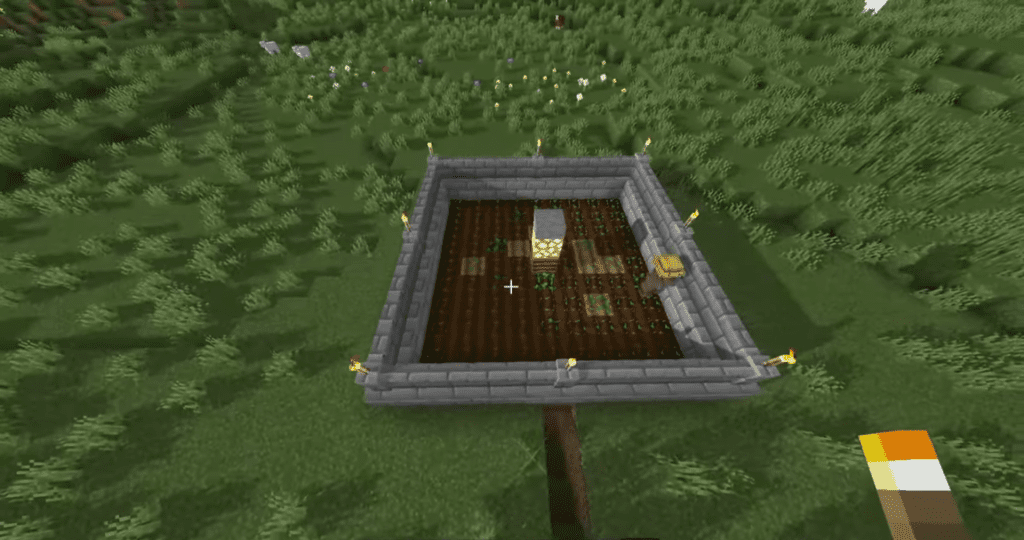
You can pretty much build this farm with basic solid blocks, some rails, powered rails, villager egg, crop seeds, and many other resources, including chests and grass.
Start off by digging a 9×9 square in the ground that is 2 blocks deep. Then, you need to decide which side of the square will hold your chest. Once decided, go to the center of that side and dig 2 blocks side by side that are 2 blocks deep.
Drop a double chest down there and place 2 hoppers on top of them. Now dig the remaining blocks on each side and put more hoppers on the holes. You need to crouch and face the other hopper while placing the new one to place them correctly.
Now skip 1 block and then dig a horizontal trench that is 2-blocks deep. Then go to the opposite side, skip 2 lanes and dig the same 2-block deep horizontal trench on the 3rd lane.
Place 9 Redstone torches in a row inside each trench and then cover both trenches with dirt. Now dig a staircase to access your chests. Then place 3 powered rails in each lane facing the hoppers.
Do the same on the other side as well. Connect both sides with normal rails. Place all 9 railcars with hoppers ( one on each track), and they should start going back and forth on the tracks.
Now build a wall around the whole thing to make it more secure. Fill out the entire field with dirt blocks to hide the railcars under them. Place a water bucket in the center of the field with a slab, and then use a hoe on the entire field to make it plantable.
Place a composter on top of the water source and then place a glow stone on top of it, followed by a slab. Then place torches around the entire farm and plant the wheat seeds across the field. All you need now is a villager, and that’s it; your wheat farm is ready.
Villager Farm in Minecraft
If you want to increase the number of villagers present in your settlement, you can establish a Villager Farm and have them procreate and increase the population of your settlement. This farm is fairly simple to set up and won’t require many resources.
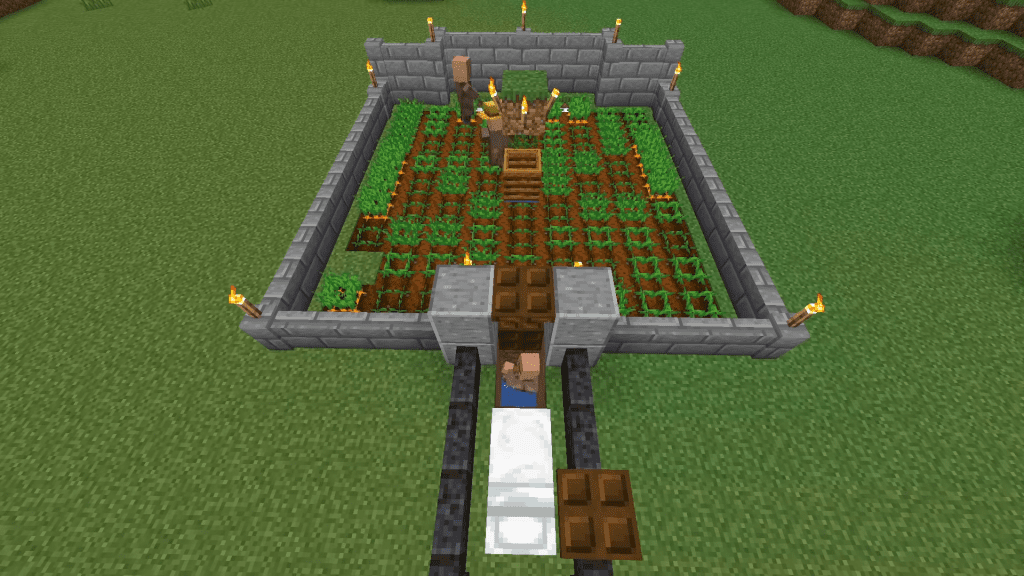
Here are some of the resources you’ll need to build a Villager Farm in Minecraft.
- 2 Stacks of Carrots
- A Water Source
- 3 Beds
- A Composter
- Some Solid Blocks
- Some Trap Doors
To start building this block, decide on a central area and dig 1 block to put the water source inside it. Now plow 4 blocks in each direction, with their center still being the water source.
Then, plow the remaining blocks within the boundaries of those 4 lines you just plowed. It should look like a small crop field. Now, dig 2 holes on one side of the field and put the beds inside them.
Now plant all of your carrots or any crop of your choice across the whole field. Go to the side opposite the one where you placed your beds and place solid blocks of height 2 with 1 block of gap between them to form 2 pillars of sorts.
Afterward, you need to place the Composter above the water source. Then build a wall around the whole field while keeping the wall a bit high on the side where you placed the beds. Leave 1 block of space for the villagers to enter.
Now, place the villagers inside the field and then put a trap on top of the pillars you just built so that the villagers can’t leave. Then dig a trench right under the pillars that are 4 blocks deep and 2 blocks in length. Place trap doors on top of both the blocks and close them.
The next step is to place another bed right next to the base of the trench in a vertical position. Cover the 3rd bed with walls as well. And with that, your Villager Farm is ready!
Castle-Like Farm
Another creative farm you can build is a castle with multiple layers that has different crops and fruits on each level. You can make a pretty good-looking castle using the following stones:
- Cobblestone
- Stone Blocks.
- Polished Andesite
There are hundreds of castle templates out there, so go and find one that intrigues you and replicates it in your world.
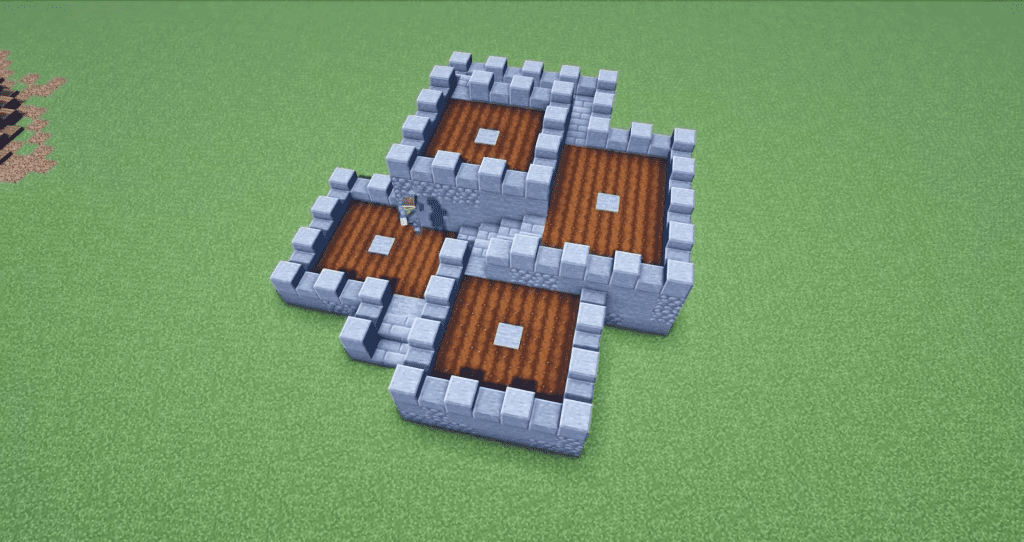
You can make square fields and divide them with thick walls to create a castle-like effect. The aesthetics can be tweaked to whatever you want, and you can also implement the wheat farm we’ve mentioned in this guide in this castle.
We suggest that you add a lot of torches to the castle walls to give it a more realistic and cool look.
All-Purpose Animal Farm in Minecraft
Having an animal farm can never go wrong, especially if you plan to keep the world for long and build other establishments. You can acquire meat, leather, eggs, feathers, and many other useful resources from an animal farm, and building one isn’t that tough either. You’ll only need beginner-level resources to build this farm in Minecraft
- Stone Bricks
- Stone Slabs
- Something for the Roof ( or not if you want to keep the farm open from the top)
You need to create 2 or 3 pens using stone bricks and then have an interconnecting corridor between them. Ideally, the corridor should be 10 blocks long and have pens of about 5-6 block lengths on either side.
Leave small cavities on either side for the animals to enter and use either a stone or wood roof if you want. According to your needs, you can keep cows, hens, and other farm animals here.
Building structures in Minecraft is so much fun mainly because you are not bound to follow a set of rules and can take inspiration from someone else and modify it however you like.
Iron Farm
Iron is an essential resource you’ll be needing if you want better gear or maybe want to build structures that utilize iron. Having a definite supply of iron is always a good idea, and that’s why we suggest building this simple yet effective iron farm.
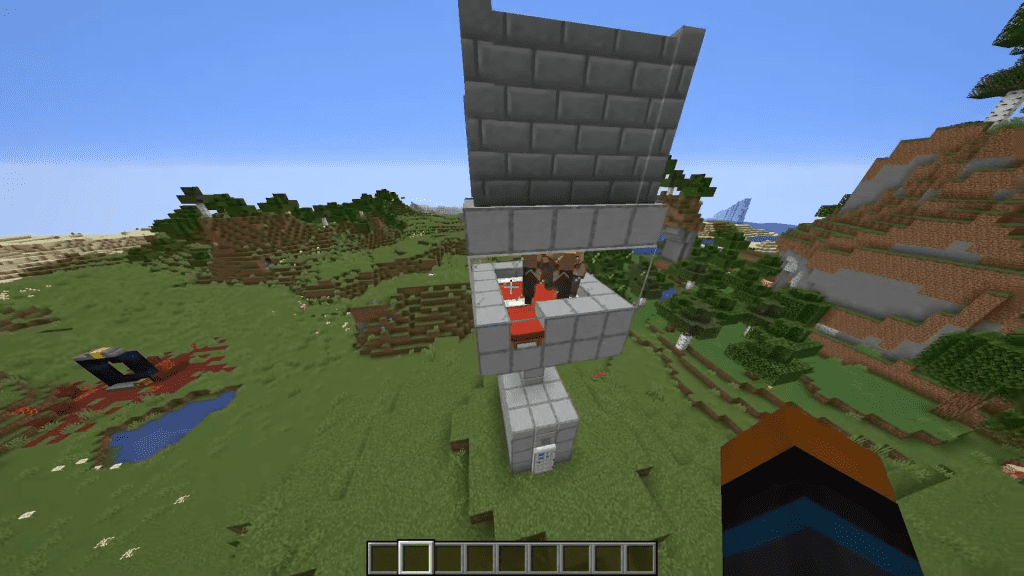
Here are all the materials you’ll need to build an Iron Farm in Minecraft
- 68 Solid Blocks
- 32 Glass
- 5 Beds
- 2 Villagers
- 3 Hoppers
- 1 Chest
- 48 Walls
- 4 Signs
- 1 Water
- 1 Lava
Start building on a high spot in your world and stack 8 solid blocks on top of each other. Now, build a 5×5 platform at the top of this stack. After that, you need to place all 5 beds in the same order as shown below:
Now place blocks around the beds and then build a 2-block high glass wall on top of the whole thing. Then, your room is ready for the villagers. Make a ramp using solid blocks and then make a train track to transport the villagers to the top.
Give them carrots, and after a while, they should start having children. Then you need to place a chest in one corner, surround it with 3 hoppers and place solid blocks over the rest of the area.
Build a high wall around the whole thing and then place a lava block above the chest and a water source in the other corner.
Your setup is now complete, and as soon as the villagers sleep and wake up the next day, an iron golem will spawn on the roof and die to the lava, resulting in all of the iron falling inside the chest.
This farm is good for early-game and even mid-game, and you can further speed it up using an AFK sleep pod.
Automated Bamboo Farm
If you want to build a bamboo farm, this one will surely interest you. It’s a bit complex to build and requires you to have some advanced resources. Here are all the resources you need to build this farm in Minecraft:
- 2 – Sticky piston
- 5 – Observer
- 3 – Redstone repeater
- 3 – Redstone dust
- 41 – Redstone torch
- 1 – Button
- 1 – Redstone lamp
- 2 – Chest
- 20 – Hopper
- 3 – Obsidian
- 18 – Slime block
- 158 – Building block
- 2 – Water bucket
- 649 – Glass
- 486 – Bamboo
- 400 – Rail
- 160 – Powered rail
- 1 – Lever
- 20 – Hopper Minecart
We suggest that you follow this Bamboo Farm video by Shulkercraft to get the farm up and running as fast as possible.
Dripstone Farm
A fun farm idea would be to create a Dripstone Farm. It is doable after update 1.17.0 with the addition of a new resource; called Dripstone. We’ll help you create a farm where you can farm Dripstone, Lava, and water.
To start building this farm, you need to dig a block in the ground and place a chest inside it. Then place a hopper behind it, facing the chest, a piston facing forward, an observer facing towards the front of the farm, and another piston above that observer.
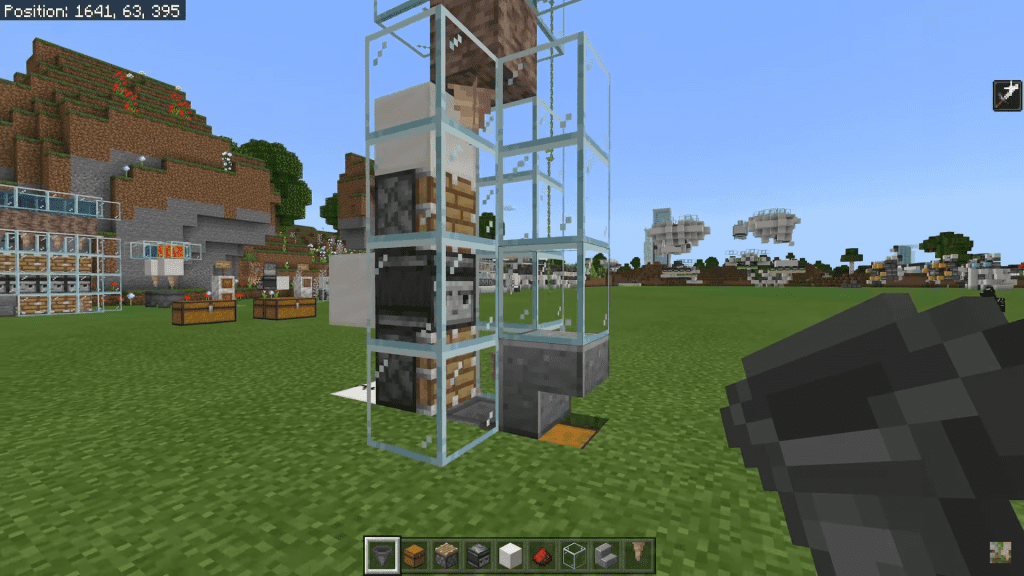
Go behind the piston on the ground and place a solid block, followed by some red dust. Leave one block of space and place another solid block above the first one, with a piece of Redstone dust on top of it, just like the first one.
Now place a dripstone block above that solid block, followed by some glass blocks surrounding it. It should have a cavity in the middle, and that’s where you’ll be using a water source.
Now, you can place the Dripstone directly below this water source. Then surround the whole thing with some solid blocks, preferably glass, so you can keep track of the Dripstone’s growth. Now, place a little stair just above the chest, covering it up with more glass blocks. There you go; your dripstone farm is now ready!
Circular Farm
A fancy farm idea would be to create a circular farm using wood blocks for the most part. This farm works best in Survival mode. You’ll be needing wood of different types:
- Spruce Wood
- Stripped Wood
- Dark Wood
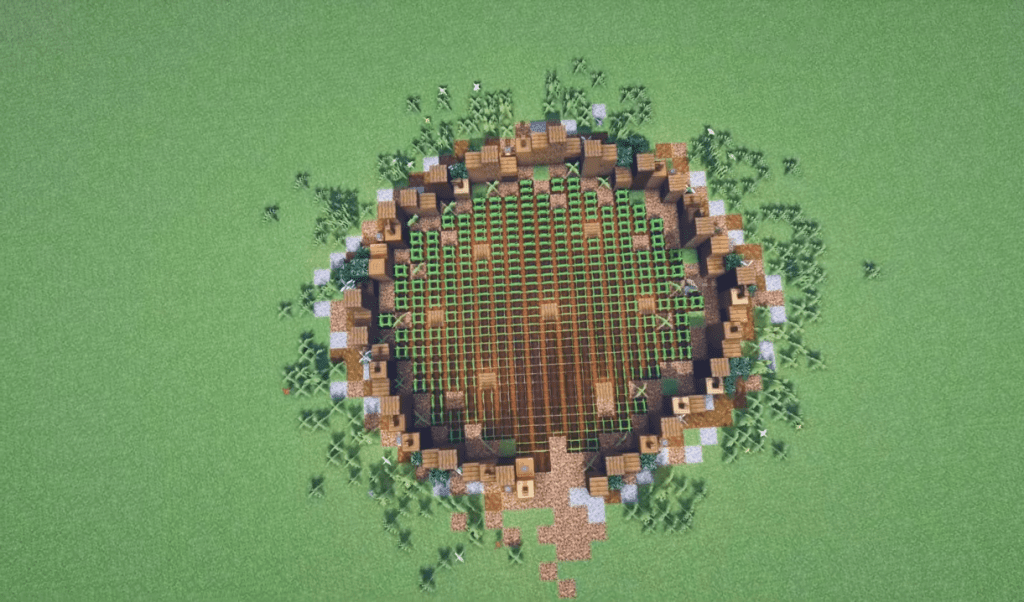
The height of the different pillars you’ll be making is totally your preference. You can decide how much you want to expand your farm. You can look up any circular farm template on youtube and then modify it according to your taste.
Wool Farm
This farm is quite easy to build and won’t require you to kill your sheep. It’ll only sheer the sheep and store all of the wool in a chest. You can follow the method we mention below to build and modify your farm based on the wool dye you want.
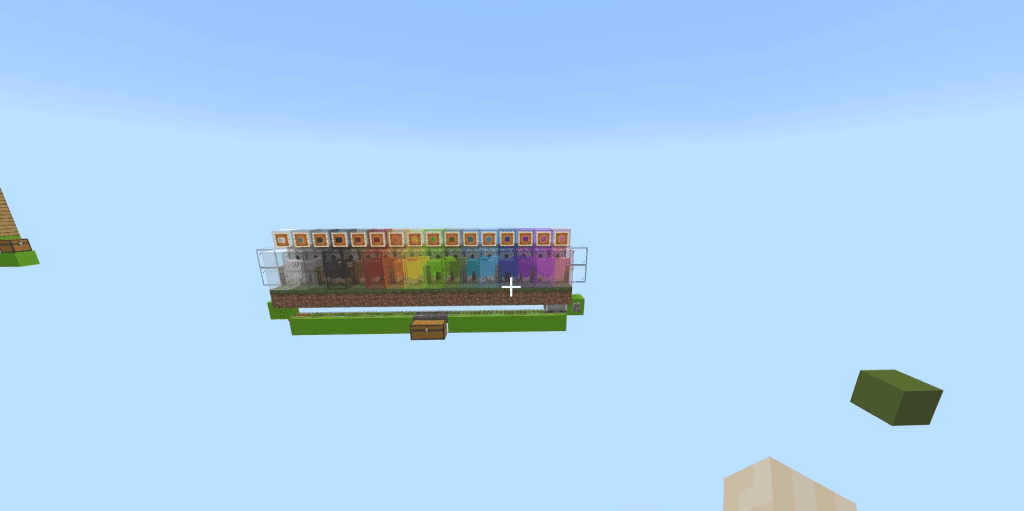
Here are all the resources you need to build a wool farm in Minecraft:
- 1 Torch
- 1 Lever
- 1 Mine Cart with Hopper
- 16 Lime Concerete Frames
- 16 Solid Blocks
- 14 Rails
- 2 Hoppers
- 2 Powered Rails
- 34 Grass
- 32 Observer Blocks
- 2 Chests
- 16 Dispensers
- 52 Glass Blocks
- 16 Sheers
- 16 Trap Doors
Start building the farm by placing Grass blocks of length 16 and width 2. Put 16 observer blocks on the back, facing inwards, and then another layer of observers on top of them. These observers will know when the sheep have eaten grass and when their wool is ready to be sheered.
Now place a layer of dispensers on top of the observers and place sheers inside each of them. Take out your trap doors and start placing them from 1 edge to the other by skipping 2 blocks in between.
So, you’ll be placing 8 trap doors across 16 blocks. Once done, turn around and start placing them again on top of the traps to double them up.
Place glass blocks on the lane next to the traps and keep them 2 blocks high. Cover the sides of the farm with glass blocks to prevent the sheep from hopping over. Now, place 2 sheep in each “pen” and cover the top with glass blocks to prevent them from leaving.
Now go to the bottom of the farm and start placing lime concrete blocks across the whole thing in 1 single line and raising it to 1 block above from both sides.
Place powered rails on each side and then place a red stone torch next to 1 power rail, followed by a lever next to the other powered rail. Cover the rest of the block line with normal rails.
Go to the middle of the railway track and place a double chest on one side. Then, go to the other side, break the blocks behind the chest and place 2 hoppers behind the chest. Then, place rails on top of the hoppers. And your wool farm is now ready!
These were some of the fun and important Minecraft Farm Ideas we had for you, and we will be updating this guide in the future to include more farm ideas, so stay tuned for that!

